We have been homebrewing our own seltzer since 2009. It is as cheap and eco-friendly as it is delicious. Today SodaStream and similar counter-top appliances will let you do it pretty easily, but I prefer this method, which doesn’t require constant CO2 cartridge purchases and doesn’t take up any counter space.
If you like club soda/seltzer/carbonated water and are interested in learning how to make it yourself, here’s how we do it.
1. The Components

I purchased all the parts we needed for under $300. A sizable start-up cost, but we’ve easily recouped that and more in savings from not buying seltzer at the grocery store, not to mention the hassle of lugging it home and the subsequent waste. Lots of online vendors have what you need; I used Northern Brewer for most of mine and was happy with the parts and service.
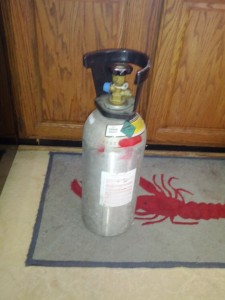
- CO2 tank (Got this 10lb tank for under $100 in 2009 — you can likely find a better price elsewhere. We went with 10lb because it fits under the sink. If you can accommodate a 20lb tank, go for it. If you can find a site with free shipping, definitely go for it. Also, the tank will ship empty and you’ll need to fill it up to get started. See Section 3 – Maintenance below for more on this.)
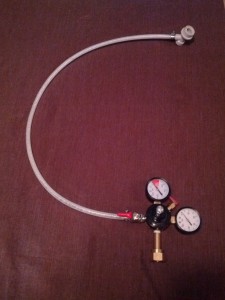
- Regulator (Go with the double gauge — a bit pricier but data worth knowing.)
- Tubing (Three feet should be plenty unless you’re running it up through your sink or some longer distance.)
- Clamps (Get two. These tighten around the tube, sealing it to the regulator on one end and the Ball Lock Disconnect on the other.)
- Ball Lock Disconnect (This goes at the end of the tube and connects to the carbonator cap on the bottles when you’re injecting the CO2.)
- Carbonator caps (Get one for every bottle of seltzer you want to have in your fridge. We got six.)
- Empty 1-liter soda bottles.
2. The Process

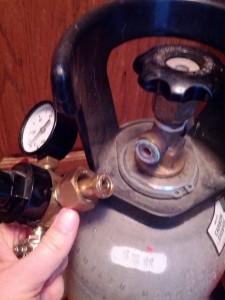
Attach the regulator to the tank (be sure you have a good seal), the hose to the regulator (using a clamp), and the Ball Lock Disconnect to the hose (again using a clamp). I keep the regulator at 50lb, which seems to be a good level of pressure and carbonation.
Next, I’ll fill the bottles 80-90% full of water, screw on the carbonator cap (tight), and then release the excess air. You can do this by pressing in the silver ball on the top of the carbonator cap and squeezing the bottle until water comes out. Now you’ll have a compressed bottle with no air inside. It’s ready to be filled with CO2.
I open the tank and the regulator valve as well, so the air is flowing through the tube and stops at the Ball Lock Disconnect. The hose is attached to the bottle by putting the carbonator cap inside the Ball Lock Disconnect. This is a little tricky and involves pulling up the rim of the Ball Lock Disconnect as you snap the carbonator cap into place. Once it’s in, the bottle will immediately fill with CO2. I shake the bottle up and down for about 20 seconds, then disconnect and pop it in the fridge. Waiting at least an hour to drink has given us the best results.
3. Maintenance
Not too much to worry about here. This system is pretty low-maintenance on the whole. Just be sure you close up your tank after every round.
While you don’t have to buy new CO2 cartridges regularly, eventually your tank will run out of gas (we went almost two years on our last 10lb tank). If you’re in the DC area, Roberts Oxygen has multiple locations and will swap out/refill a 10lb tank for $24. The closest location to NW DC is on Railroad St. in Gaithersburg, MD.
A note about safety: compressed gas is potentially very dangerous. I’m no expert on how to handle a CO2 tank, but I am careful. I always make sure the tank valve is closed tightly between uses, as well as the regulator valve; I make sure the tank is closed when attaching and disconnecting the regulator; I never transport the tank with the regulator attached. Please, please read up on gas tank safety. A carbonation disaster could be as embarrassing as it is tragic. Using my tips for setting up your own homebrew system is all well and good, but it doesn’t change the fact that the responsibility for doing it safely is yours.
4. Enjoy the Bubbly
You may want to add flavors, syrups, etc. A slice of lime is our flavor of choice. However you like it, I think you’ll find it’s just a little more delicious given the work you put in to making it.
Other resources
This is the site I used to set up our system. Slow to load but lots of good info.
The Bible of seltzer homebrew. More than anyone needs to know about the science and art of seltzer-making.

These topics are so connfsiug but this helped me get the job done.